I want to introduce a simple modularization setup that I like to use as a staring point for new apps:
The code included in this post is available here.
Table of Contents
- Why Modularize?
- Using Local Packages
- Structure
- Dependency Management Between Modules
- Third Party Dependencies
- How to start using this?
- Scaling the Approach
- Conclusion
- Related Articles
- Featured in
Why Modularize?
Before diving into the implementation, let’s quickly cover why modularization is great for your app:
- Improved build times - Only the modules you modify and their direct dependents need to be recompiled, rather than the entire app
- Better separation of concerns - Each module has a clear responsibility
- Enhanced testability - Modules can be tested in isolation
- Easier collaboration - Team members can work on different modules simultaneously
- Code reusability - Modules can be shared across different projects
For a deeper dive into the build times, you can check this post: Improve Build Times
Using Local Packages
This is a simple yet effective approach to modularizing your iOS app using Swift Package Manager’s local packages. This approach provides a good balance between structure and simplicity, making it ideal for new projects that you expect to grow over time.
The idea of pointing locally to the packages, is that it will allow us to code faster, as we don’t need to manage versioning.
By separating the code into different packages, we start the project with right foot and avoid gigantic 1-module apps.
The only con I see with this approach is that it is not possible to run the module unit tests from the main app workspace, as the test target do not appear as schemes (and it’s not possible to reference them when crearing a new one). However, this can be solved with some tooling to run all the tests from the console, or just the ones in a particular module.
In the repository, I’ve added a basic fastlane integration to run all the tests of the packages:

It supports some parameters for verbosity, and it reports the code coverage for each module.
Structure
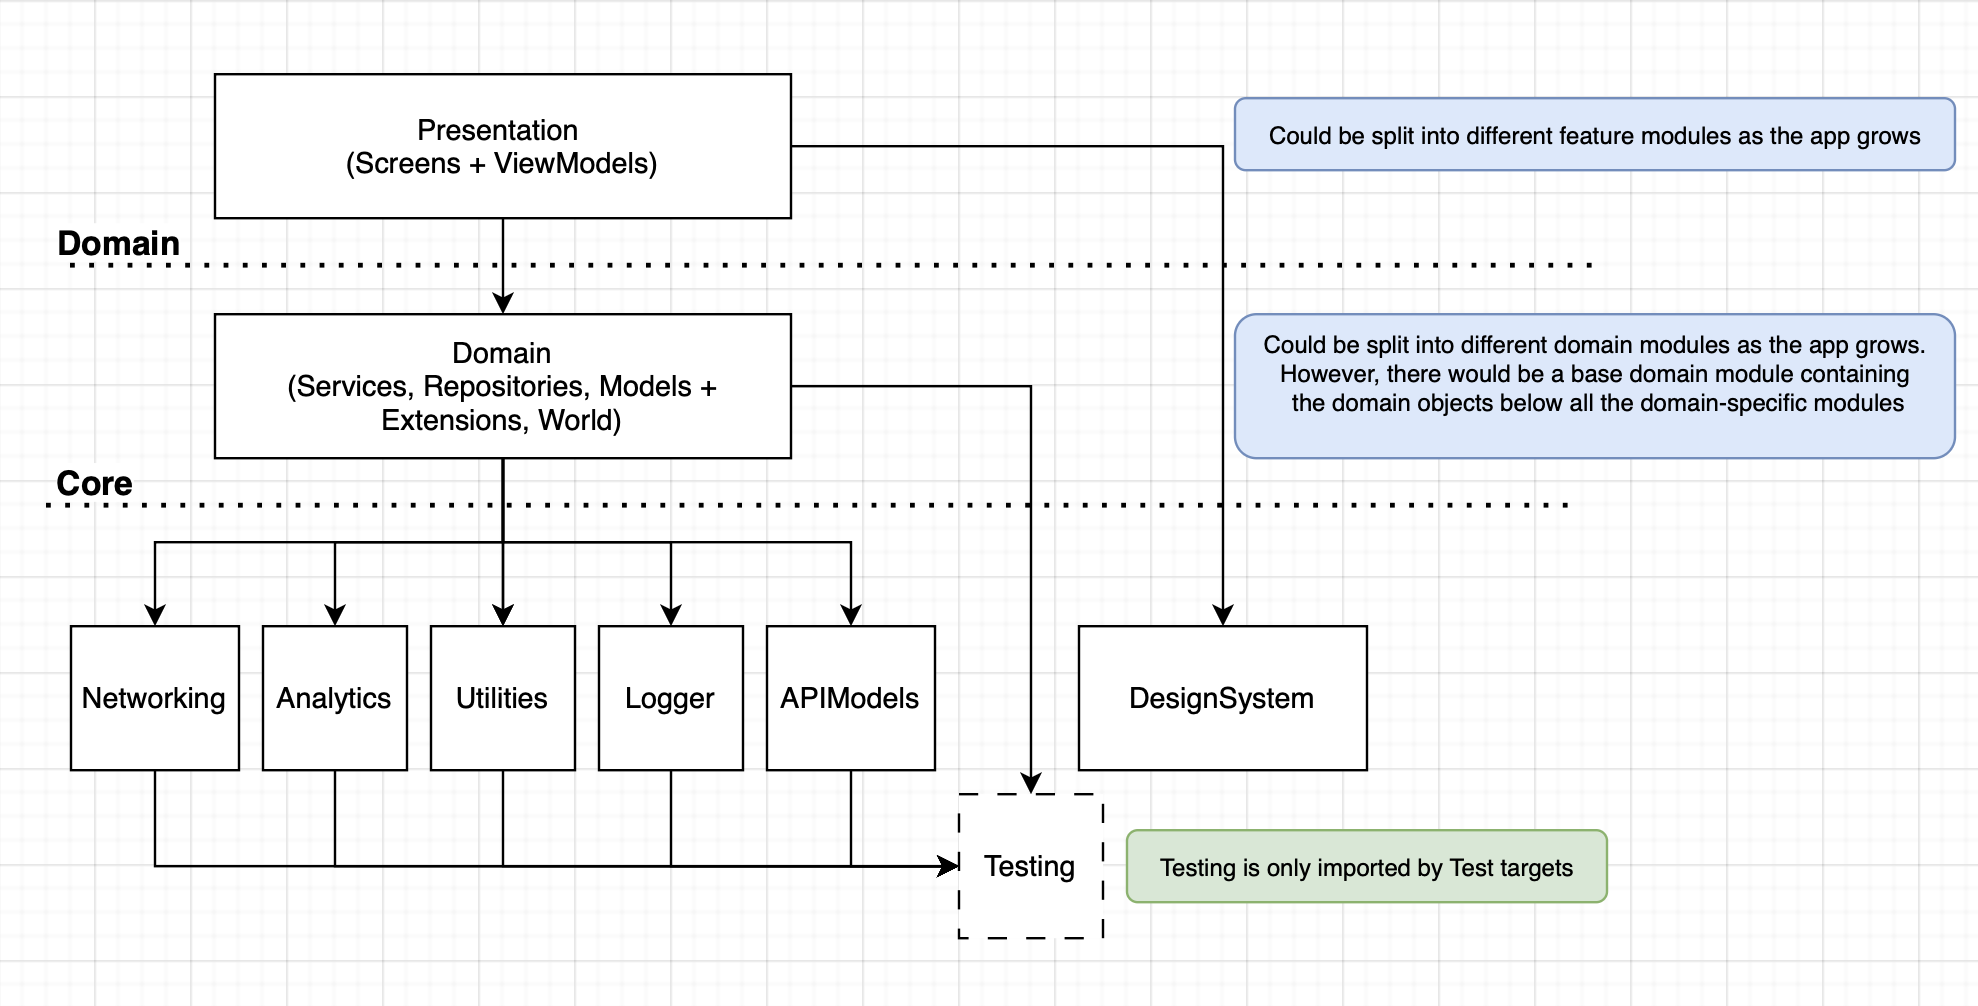
The structure of the modules dependencies follow the dependency diagram image. It is really simple, as it is a starting point.
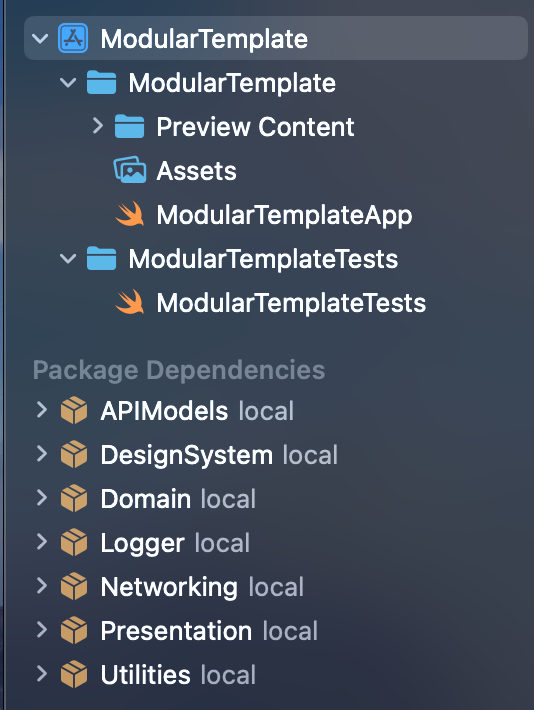
The Xcode project is just a really thin layer, that only contains the Presentation dependency (The others are transitive dependencies).
The project looks like this:
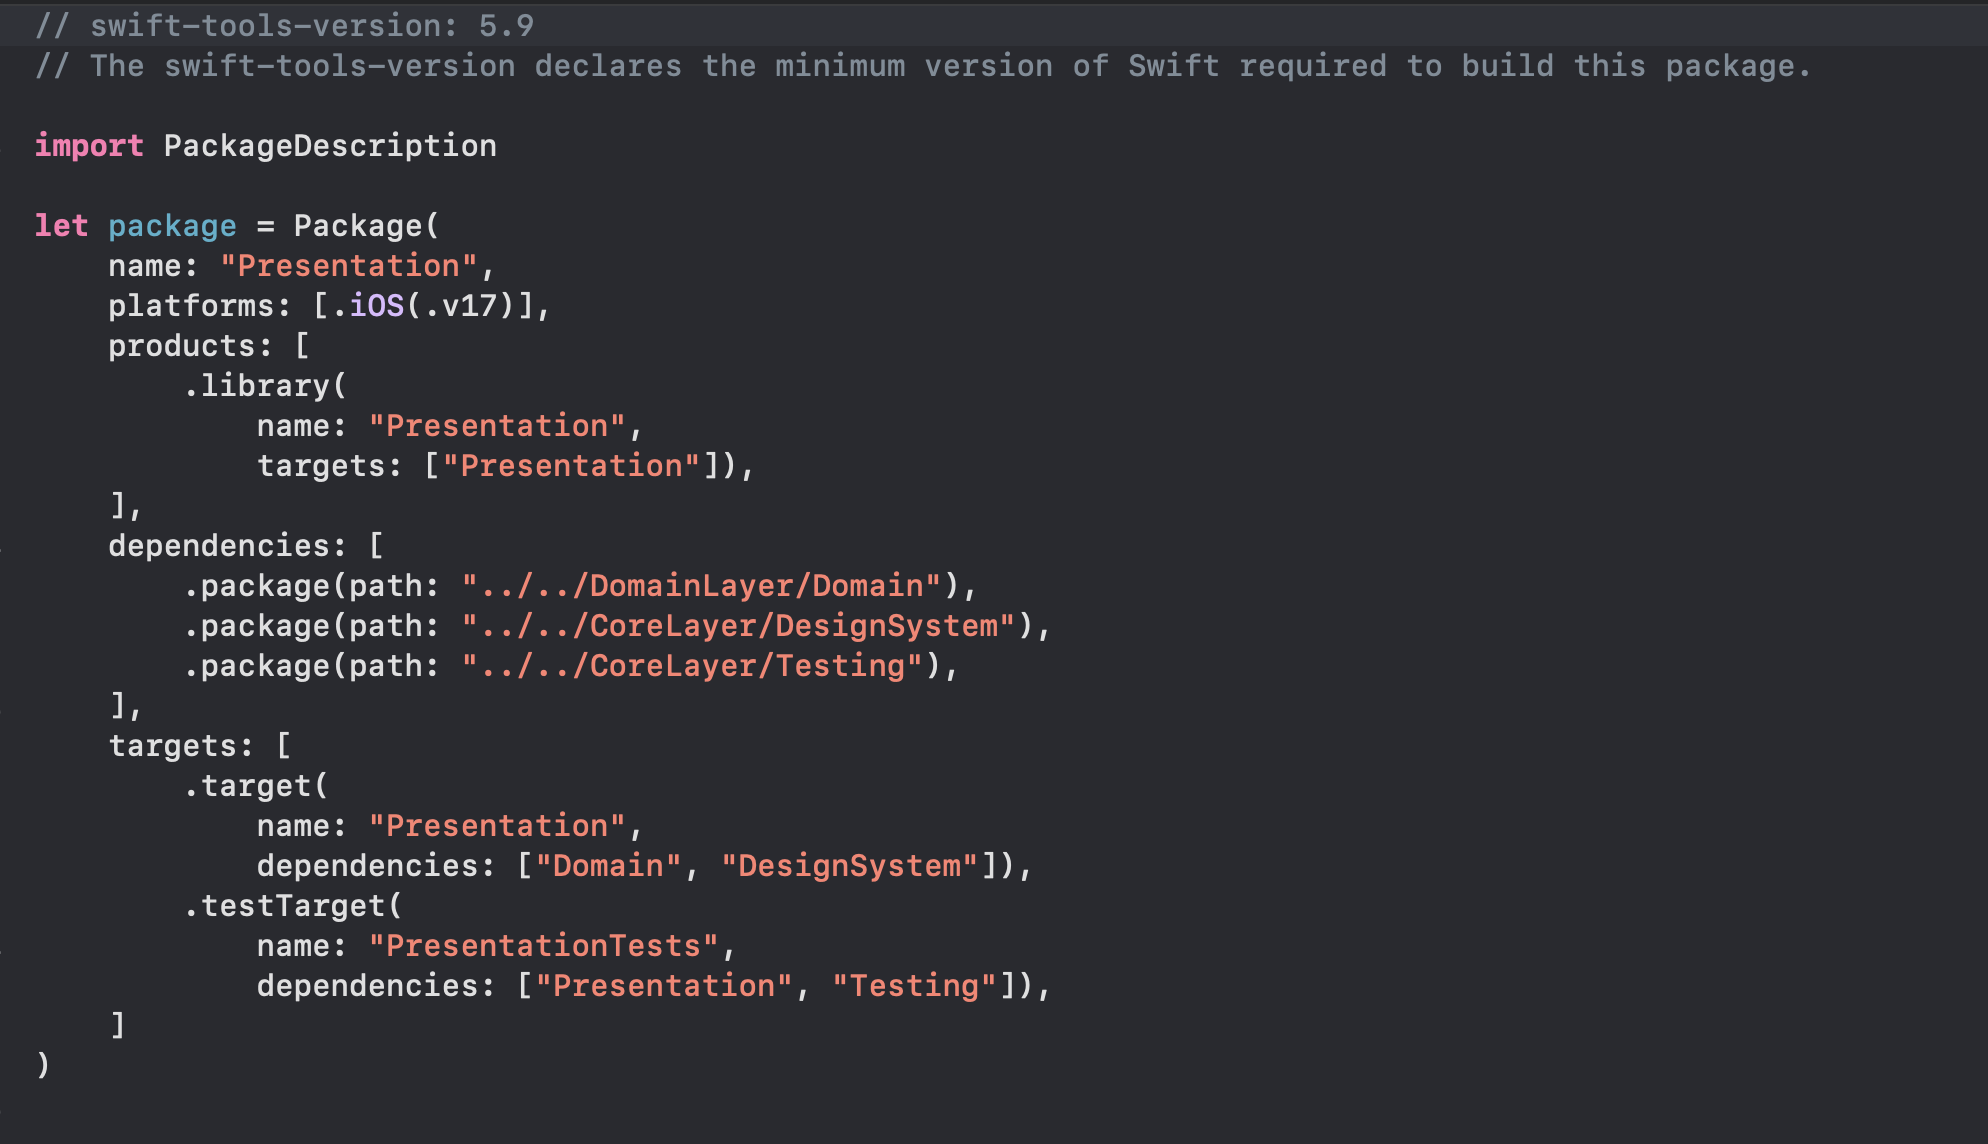
This is how the Presentation package looks like:
This is how the Domain package looks like:

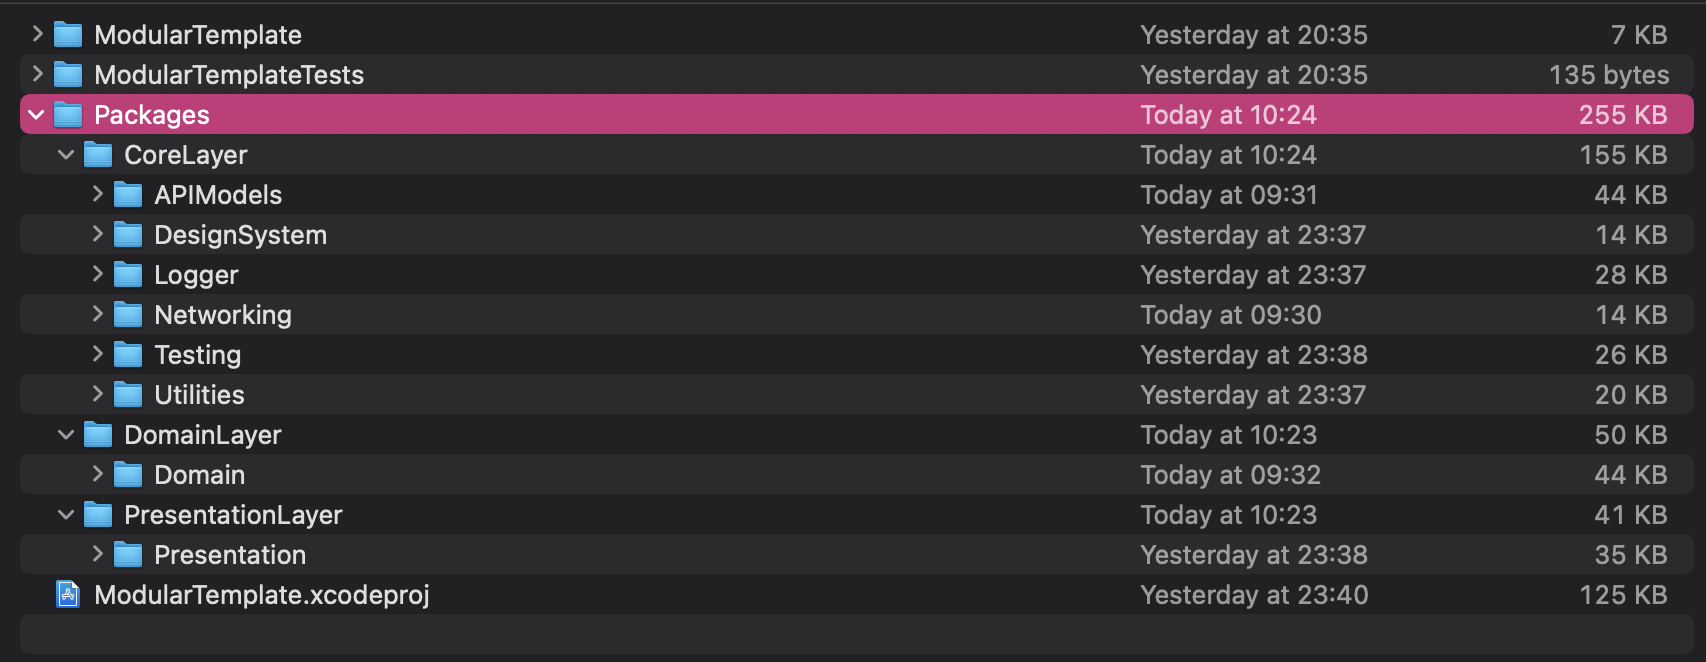
And the folder structure:
Dependency Management Between Modules
Be mindful of dependencies between modules. A good rule of thumb is:
- Core modules should have minimal or no dependencies on other modules.
- Domain modules can depend on
Core modules.Domain modulescannot depend onDesignSystem. - Feature/Presentation modules can depend on
Domain modulesandCore Modules.
This creates a clean dependency graph that avoids circular dependencies.
CoreLayer
This layer is for the foundational packages.
Every other package can import a package from this layer (including other Core Packages).
Think of this layer as the fundamentals for your app.
Examples include:
- API Models: The decodable object representation of the backend data. More info in UI vs API Models
- DesignSystem: All the tokens (colors, fonts, sizes, images), and the reusable components of the app (buttons, inputs, toggles, etc). This layer is imported directly from the
Presentationlayer. - Logger: A logging mechanism. I find this one really useful.
- Networking: Here you could either import a third party library, or create your own implementation. For new projects, I usually start with something like this and only evolve as necessary.
- Storage: Something simple as a UserDefaults wrapper to begin with, it can evolve to support caching mechanism when needed.
- Utilities: Extensions useful across the app. Examples:
- Strings+Extension
- DateFormatters
- JSON+Extension
- NumberFormatters
- NotificationCenter
- Testing: Useful extensions to enhance XCTest. More info in: Unit tests helpers
Domain Layer
This is where the business logic lives. Domain should only depend on Core packages.
If in need in the future, you can split up the Domain into multiple modules.
This is the layer that it’s most important to cover with unit tests.
Some advice on how to achieve that in:
This layer is also where the World object lives from: Centralized Dependencies
In this layer, you will also have the:
- Services (import Networking to talk with the backend)
- Repositories (import Storage to persist data)
- Real app models (with their mappers from the API models)
- Extensions on the models to represent their capabilities
Quote from Domain Driven Design:
A model is a simplification.

1. The model and the heart of the design shape each other.
2. The model is the backbone of a language used by all team members.
3. The model is distilled knowledge.

Developers have to steep themselves in the domain to build up
knowledge of the business.
Presentation Layer
This is where the Screens live. Presentation depends on Domain, and DesignSystem. It can also depend on CorePackages directly if needed.
Each Screen will be composed of many DesignSystem components.
The development team can decide which UI pattern (MVVM, MVP, VIP, VIPER, TCA, etc) to use.
It’s important to cover the state changes with unit tests.
In this layer, we could also include:
Third Party Dependencies
Third party SDKs should be in the Core Layer, however, we need to create a wrapper package (following the adapter and factory patterns) for each SDK.
So, for example, the Analytics package would import FirebaseAnalytics, and only expose the necessary methods, without any hint to the use of Firebase under the hood. This will allow developers of the Analytics module to A/B test different libraries, or to change SDKs without any change needed from the importer packages.
How to start using this?
As packages are really easy to move around, importing this structure into your app is really easy:
- Clone the repository
- Copy the Packages folder into your project
- Add the
Presentationlocal dependency in your Xcode Project or SPM Package
In your repository, you could also add Contributing Guidelines and The Definition of Done.
There is also a contributing guidelines in the repository that can be used as a starting point.
Scaling the Approach
As your app grows, you might need to:
Splitlarger modules into smaller onesCreatenew module categories (examples: SSO, Chat, Health, Bluetooth, etc)- Consider using
remote packagesfor truly reusable components (only if the team grows a lot)
The beauty of this approach is that it scales really well - you can start simple and evolve as needed.
Conclusion
Modularizing your iOS app doesn’t have to be complex. By starting with a simple structure using local Swift packages, you can enjoy the benefits of modularization without overcomplicating your project setup.
This approach provides a solid foundation that can evolve with your app, making it easier to maintain, test, and collaborate on as it grows.
Something important to notice, is that you want to really think about your dependency structure, if you go down the rabbithole of the microapps architecture, and you add a packaage everytime there is a minimum hint for it, you could end up in a dependency hell project structure, which might be difficult to maintain.
As a reminder, the code included in this post is available here.
Related Articles
For more information on modularization, architecture, testing, and project structure, check out these related articles:
- Only run unit tests for changed modules
- Improve Build Times
- UI vs API Models
- Enhancing Testability with Protocols
- Enhancing Testability without Protocols
- Centralized Dependencies
- Contributing Guidelines
- ViewState
- ViewStateController
- The Definition of Done
Featured in
I’m really curious about what people think about this approach. Let me know in the comments if this is something you find useful. Maybe it’s too simple? Maybe too complex for a new app? Write down your thoughts and we can chat about it!